1 Introduction
This document describes the development standards for SAP R/3, Workbench objects. These standards define the approach to be followed by all developers during development and maintenance activities.
These guidelines ensure that:
- Objects are implemented in a consistent manner
- Efficient development and maintenance.
2 General Naming Standards
2.1 ABAP Programs
2.1.1 ABAP Program Naming Standards
The maximum length for an ABAP program name is 30 characters. This format will help identify programs within a functional subsystem within an application area.
Format: Z_BBCC_..._E---E
Where: Z = “Z” represents custom programs.
_ = Underscore
BB = Functional area ex: FI, SD etc.
CC = Functional subsystem within the functional area –.
_ = Underscore
... = <open – descriptive of the program function, abbreviated as required>
_ = Underscore
E---E = a word or abbreviation describing the type of program –
EXAMPLE:Z_SDSALES_RPT(REPORT PROGRAM)
Z_SDCUST_BDC(BDC PROGRAM)
Example: Z_FIAP_POSPAY_OUT or Z_HRPA_ROLL_OUT ( Out bound interfaces )
Z_FIAP_RETURN_CHECK_RPT ( report program )
2.1.2 Names of modified SAP program objects
If security is required at the program or application level, obtain the appropriate security object from the SAP security team.
- Make a custom copy of the object according to the rules in the following sub-sections.
- Make the necessary modifications in the custom copy.
- Place a “Z”, to represent custom development, in front of the SAP report name (as the first character).
- This standard does NOT apply to any module pool or function object. - Place a “Z”, to represent custom development, in front of the module pool, e.g. SAPMA03B would become ZSAPMA03B and its INCLUDE module MA03BTOP would become MZA03BTOP, etc.
- Decide whether your change will be at risk if there is a support pack change to any of the INCLUDE modules, and if so then make sure to copy ALL INCLUDES to a NewellRubbermaid name even if you have no change to make in them.
- IF you need to ADD new sub-routines, then create an entirely NEW include module called MZMA03BX…X– where “X…X” is any suitable acronym that may be extended to suit your need.
2.1.2.1 Names of modified SAP reports, sub-routine pools and report include modules.
2.1.2.2 Names of modified SAP module pools and their include modules
2.2 Transaction Codes
2.2.1 Transaction Codes Naming Standards
The maximum length for a transaction code name is 20 characters. Please make the names meaningful and at the same time keep it short.
Format: ZBBCC_...X
Where: Z = “Z” represents custom programs.
BB = Functional area ex: FI, PP etc. refer Appendix A
CC = Functional subsystem within the application area – refer Appendix A.
_ = Underscore
… = Meaningful abbreviation for the transaction
X = optional alphanumeric identifier.
1 for create
2 for change
3 for display
6 for Delete
9 for List processing
Example: ZFIAR_GLIST1, ZFIAP_GLIST1
2.2.2 Transaction Codes Design Standards
- Follow SAPGUI standards to maintain the SAP look and feel; e.g. always provide 3 ways to reach each option – menu, button and function key.
- Use the screen painter and the menu painter to maintain consistency – use 1000 as the first main screen, then increments of a thousand for separate functionality, or increments of a hundred for sub-screens. Don’t use multiples of ten or one unless going to sub-sub-screens, or to distinguish some tiny refinement for a special case.
- Follow SAP standards for naming module pools, i.e. SAPMZ… for the main program, MZ… for the include modules.
2.3 Menus or PF Status
2.3.1 Menus or PF Status Naming Standards
The maximum length for a menu name is 20 characters. The NewellRubbermaid standard for custom menu names will be six characters, with the following format:
Format: Z…
Where: Z = “Z” represents custom programs.
… = Open
Example: ZMAIN
2.4 Function Groups
2.4.1 Function Groups Naming Standards
The maximum length for a function group name is 26 characters. Please make the names meaningful and at the same time keep it short.
Format: Z_BBCC_…
Where: Z = “Z” represents custom programs.
_ = Underscore
BB = Application area or functional area .
CC = Functional subsystem within the application area .
_ = Underscore , Constant.
… = Open – try and use short meaningful abbreviations.
Example: Z_HRPD_DATEF = Human Resources Date Functions,
Z_FIAP_DATE (theoretical case that matches naming convention)
Note: The creation of a function group results in the creation of a main program for the function group called SAPLxxxx, where xxxx is the name of the function group – no matter how long it is, hence the request for short names; e.g. SAPLZPDF, with include modules named LxxxxTOP (Global definitions), LZxxxxUXX (all includes for the individual functions), LZxxxxUnn (include module containing an individual function; “nn” is program assigned code starting at “01” and incrementing as new functions are built in the group), LxxxxF01 (Forms), LxxxxO01 (PBO modules), LxxxxI01 (PAI modules).
2.4.2 Function Groups Design Standards
All logically related function modules should be assigned to the same function group.
Do not attempt to place a new NewellRubbermaid function in an SAP function group – even if it is related!
Do NOT place unrelated functions into the same function group just to avoid creating a new group - it is much cleaner to create a new function group if there is no suitable one available. In fact it may be a great deal more efficient at run time as there is not much point in dragging 20 functions, for example, into memory if only one is required.
It is recommended that if you are building a complex function group that you place related sub-routines in separate include modules LxxxxFnn rather than build one huge include module.
It is imperative for the sake of efficiency that you pass information from the function to the sub-routines via properly typed parameters (including tables – use a type-pool to ensure that you can define the table appropriately in the function parameters) and NOT via global fields.
Global fields should be reserved strictly for items that are used throughout the group such as constants and type-pools. Values stored globally will be retained for the entire run of the calling program – this can be a negative property just as often as it is a positive idea; use with care.
Use locally defined “STATICS” for values that need to be retained for use in a particular function or sub-routine – not a global field. Because a “static” field is locally defined there is no danger of changing it accidentally in another part of the program.
Rely on local variables (except “STATICS” of course) to be “clean” at every new entry to a sub-routine; it is a waste of time to clear them before use. This is one of their great advantages over global variables.
2.5 Function Modules
2.5.1 Function Modules Naming Standards
The maximum length of a function module name is 30 characters. The NewellRubbermaid standard for custom function modules will allow up to 30 characters with the following format:
Format: Z_BBCC_...
Where: Z = “Z” represents custom programs.
_ = constant underscore;
BB = Functional Area – refer Appendix A
CC = Functional subsystem within the application area –.
_ = constant underscore;
… = <up to 25 characters – descriptive of function’s use with abbreviations as required>.
Example: Z_FIAP_CHECKWRITE
2.5.1.1 Modifying SAP function groups
- Copy the function GROUP to a name which has a “Z”, to represent custom development, in front of the original function group name. When prompted to copy the functions you want, uncheck the ones you do NOT want and check the ones to copy and add “Z” at the front of each name you need to use. This will automatically create the appropriate programs with the proper names. Remove the last vowel if the original name was too long to add the “Z” for custom development.
e.g. To copy the function RP_SALARY_GENERIC_CALC, look up its group (= PARA) and start by copying that to “ZPARA”; you will be prompted immediately to select the functions that you need; SAPLPARA will become SAPLZPARA and the includes will become LZPARA… (e.g. LZPARATOP). - Make the necessary changes
- IF you need to ADD new sub-routines then create an entirely new include module called LZPARAF9N– where “N” is a digit from 0 to 9 or a character from A to Z; this gives you scope for 36 new include modules!
IF you need new PBO or PAI modules then create new include modules named, e.g. LZPARAO9N or LZPARAI9N. - When you are sure that you have finished, use the extended program check to remove unused code. If you did not copy all the routines in the group then is possible that some global data fields and some entire sub-routines will no longer be needed.
- Always edit and activate a function or function group via Transaction SE80 (or SE37 if you must).
- After changing or creating a function module, perform an extended syntax check to confirm the changes.
- All function parameters of all varieties (IMPORT, EXPORT, CHANGED and TABLES) must be typed with data dictionary fields elements or types defined in a type-pool.
- All data being used in subroutines within the function group MUST be passed to and from the form using properly typed parameters – NOT BY MOVING IT TO A GLOBAL FIELD. This latter habit – much used by SAP :-( is very inefficient, especially for tables and in an extreme case (large record size and large number of lines) can make an hour or more difference to the processing time.
- The command “IF <outbound parameter, table parameter or change parameter> IS REQUESTED” should be used to avoid the work of calculating outbound values that the caller does not want, e.g. refer to the function ZPDF_GET_P0041_DATES.
Remember that this command works ONLY in the function module itself and not in any of the include modules of the function group. - Remember too that ALL outbound parameters are optional.
- Use STATICS to retain useful values from one call to the next within a program run rather than a global field that should not be used by any other function in the group.
- Identify all possible errors that would require the function to hand control back to the caller for a decision and create a suitably named exception.
When an error occurs, always issue a suitable message with “… RAISING <exception name>” on the end so that the message goes back to the caller for them to decide if they want to use it or not.
Remember that when you raise an exception you automatically clear all return parameters. - If you are providing an input parameter for a field that will normally have a standard value, e.g. Company Code is most likely to be “NewellRubbermaid” = ‘001’, then provide a default value to avoid unnecessary use. On the other hand – make sure you provide a parameter even if the chance of SEATTLE’S BEST COFFEE using it is slim; e.g. see ZSRF_REPORT_HEADER.
- When you call your function you MUST AT LEAST include the “EXCEPTION OTHERS = <any numeric value>” in the parameter list. You should only need to declare individual exceptions if you have different processing for them.
- A “flower box” with details of the original author and a history of changes should appear in all modules and includes that make up the function group (e.g. LZxxxTOP, LZxxxF01, LZxxxU01, etc.), except the LZxxxUXX include module which is maintained exclusively by the system.
- Follow all the guidelines for coding any standard ABAP program.
- Calls to BAPI should be placed in their own sub-routines in an ABAP program that calls them, and their error return and message fields should be tested immediately after the call.
- BAPI, like regular functions, should NOT issue messages directly – BUT neither should they raise exceptions. Instead they should set up an error code and a message and hand control back to the caller without having taken any other action.
- This section will be enlarged in the future, in the meantime – please look at an SAP example and follow the same principles.
2.5.2 Function Module Design Standards
2.5.2.1 Messages, exceptions & a return code – BAPI
2.6 Message Classes
Before creating a new message class, check the list of valid message classes in SE91. If you can not find an appropriate class in this list, use the naming standards below to create one.
Description
| Message class |
Application Link Enabling | ZALE |
Electronic Data Interchange | ZEDI |
Workflow | ZWKF |
Cross Functional | ZXX |
Financials (All Modules) | ZFIN |
Sales and Distribution | ZSD |
Materials Management | ZMM |
2.6.1 Message Class Naming Standards
See Previous section for message class names used.
2.6.2 Message Design Standards
Always create descriptive, parameterized messages.
No message can have more than 4 parameters; just use an ampersand without any other addition.
To use a parameter in the long text use &V1&, &V2&, &V3& or &V4& to get the corresponding value – the 1, 2, 3, 4 refer to the order the parameters were passed into the message and are not names of the parameters. In the standard SYST fields these values will be found in SY-MSGV1, SY-MSGV2, etc.
- N.B. The long text must be defined
OR
the flag labeled “Self-explanatory” on the SE91 screen must be set to say that you do not want a long text.
BEWARE: If you add a new message to an SAP message group, use numbers GREATER THAN or equal to 900 for the new messages, else SAP may use your number in their next release.
2.7 Development Classes or Packages
Development classes have been predefined based on a logical grouping of functional subsystems.
Development Classes or Packages Naming Standards
The maximum length for a development class name is 26 characters.
Format: ZBB…
Where: Z = “Z” represents custom programs.
BB = Functional sub system; see Appendix A..
… = Free form.
Note: although the above define naming standards for Packages. All names have been predefined in Appendix A.
2.8 Authorization Objects
The SAP security teams will create all custom authorization objects.
Use YZ to represent custom development.
Description
| Authorization Objects |
Application Link Enabling | YZALE |
Electronic Data Interchange | YZEDI |
Workflow | YZWKF |
Cross Functional | YZXX |
Financials (All Modules) | YZFIN |
Sales and Distribution | YZSD |
Material Master | YZMM |
2.9 Layout Sets (SAPSCRIPTS)
2.9.1 Layout Sets (SAPSCRIPTS) Naming Standards
The maximum length of a layout set name is 16 characters.
Format: Z_BBCC_…
Where: Z = “Z” represents custom programs.
_ = constant underscore;
BB = Functional Area – refer Appendix A
CC = Functional subsystem within the application area .
_ = constant underscore;
… = <up to 25 characters – descriptive of function’s use with abbreviations as required>.
Example: Z_FIAP_CHKWRITE
2.9.2 Layout Sets (SAPSCRIPTS) Design Standards
Standard SAP layout sets: If there is a need to modify a SAP layout set, and the SAP provided customer enhancement /option is not available, do the following:
Make a custom copy of the layout set by placing a “Z” in front of the SAP layout set (as the first character).
Make the necessary modifications in the custom copy.
2.10 Customer Enhancements (Including user exits)
A SAP repair key is required for modification of a workbench object. To create a custom enhancement:
Use transactions CMOD and SMOD.
Follow SAP standards.
2.10.1 Example of CMOD use
Project: ZHIFTMOD
Components of ZHIFTMOD: PBAS0001 PA: Personnel Administration/Recruitment; default values and checks.
Function exits: EXIT_SAPFP50M_001 PBO Module, all code in include zxpadu01
EXIT_SAPFP50M_002 PAI Module, all code in include zxpadu02.
2.10.2 Example of SMOD use
An enhancement includes one or more components (function exits, menu enhancements, screen enhancements). It can have 8 characters. For enhancements, you are recommended to observe the following naming convention:
- Application:
1 letter (e.g. S = Basis)
You can use any characters for the remaining places. It may be that conventions are established within each department.
Example: ZFPASMOD
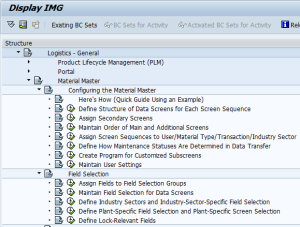
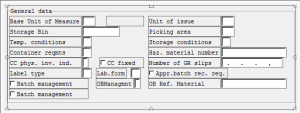
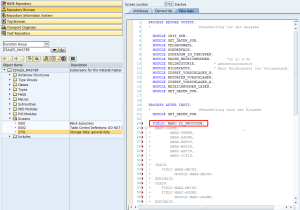
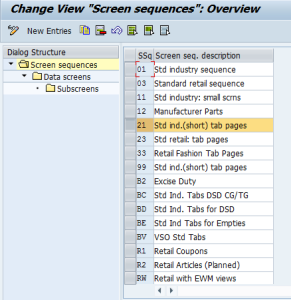
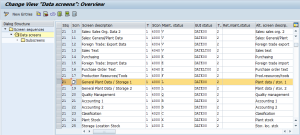
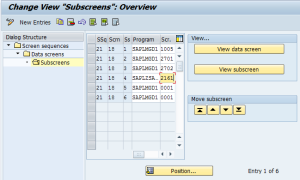
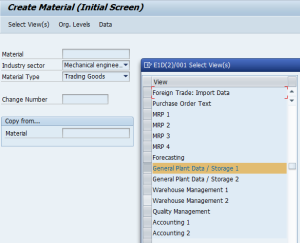
2.11 Screens
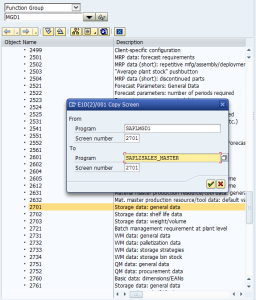
2.11.1 Screens Naming Standards
A Screen Painter screen name consists of the name of the ABAP program the screen is attached to plus a four-digit screen number. The number range for the screen number depends on whether the ABAP program is a customer-developed screen attached to an SAP program or a customer-developed screen attached to a customer-developed program. The two cases are discussed below.
Format: A…ABBBB
Where: A…A = Program name of the ABAP program (refer to the appropriate section for the naming rules of the program) the screen is attached to.
BBBB = Screen number
See below for details
Customer-developed Screens Attached to a Customer-developed Program:
Screen numbers must be between 0001 and 8999. It is recommended that the first screen for a program be numbered 0100 and each additional screen with that program be numbered an increment of 10 above the previous screen; for example, 0100, 0110, 0120.
Customer-developed Screens Attached to a Customer-developed Program:
Screen numbers must be between 0001 and 8999. It is recommended that the first screen for a program be numbered 1000 and each additional screen with that program be numbered an increments of 100 if they are small variations on the first screen, or 1000 if they are quite different; sub-screen numbers should use increments of 10 from the parent screen. Unit intervals will be used as sub-screens of sub-screens – or if you get stuck for a number!
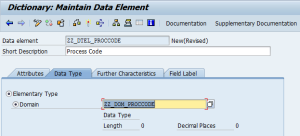
2.12 Data Definitions
2.12.1 Internal Program Data Variables Naming Standards
Data variable names can be up to 32 characters long, with the exception of selection-screen parameters and select-options which can only be 8 characters long. Variable names should be descriptive.
Variables should be named as follows:
Format: V_...
Where: V = Variable prefix
… = <Open>
Prefix | Represents |
P_ | Parameters for selection screens & sub-routines (within the form – anything goes in the call statement). |
S_ | Selection screen SELECT-OPTIONS |
PR_ | Radio button |
Type of field | Global prefix | Local prefix | Parameter prefix |
Constant | C_ | LC_ | Not applicable |
Range | R_ | LR_ | PR_ (or PT_) |
Internal Table | T_ | LT_ | PT_ |
Structure (String) | X_ | LX_ | PX_ |
Variable | V_ | L_ | P_ |
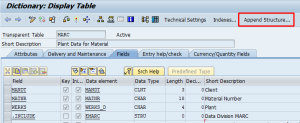
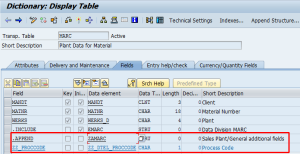
2.12.2 Tables and Fields Naming Standards
Table definitions should be formatted as follows. Only one table shall be listed on any one line of the program, and the table description should be added as the end of line comment.
Example:
TABLES: MARA, “MATERIAL MASTER DATA
T001, “Company codes
T100, “Messages
TDCT, “Dialog Modules
TAPLT. “Program application descriptions
Within a table name or within a field name, use an underscore (e.g. CUST_NO or T_LIKP). This will avoid confusion when connecting the table name and field name together with the required hyphen (e.g. T_LIKP-CUST_NO). In general, hyphens should be avoided except in the specific case of connecting a table name to a field name.
Comment work fields and fields in work records, especially those used for interfacing. Define a type first and then use it as appropriate in tables or parameters. Especially when defining internal fields that are to hold values from databases, use “TYPE” and the corresponding Data Dictionary data element name in preference to just the generic type and length to make sure that the variables have identical characteristics.
N.B. “TYPE” is preferred over “LIKE” because it is more efficient (one less look up in the data dictionary) and is the new SAP standard being introduced as part of the drive toward object oriented code. The exception is in a selection screen parameter definition where LIKE will pick up check table values for the input and “TYPE” will not.
Example:
TYPES: BEGIN OF partner_name,
REC_TYPE TYPE CHAR01, "interface type ind.
PERNR TYPE P_PERNR, "partner number
NAME TYPE EMNAM, "formatted name
END OF partner_name.
DATA: X_PNAME_REC TYPE partner_name,
T_PNAME TYPE STANDARD TABLE OF partner_name.
For each field, include a comment after the field describing the use – unless the name is unambiguously obvious.
Example:
DATA: V_LIFNR TYPE LIFNR. “Vendor a/c number
- Use TYPE-POOLS for data structures that will be used in more than one ABAP program or are required for function parameters.
- Fully declare each field unless TYPE or LIKE is used. Do not let the data type or the length default. For fields that are whole numbers, it is not necessary to define them with zero decimal places.
2.12.3 Text Elements Design Standards
Do not use hard-coded literals. Use Text Elements to handle literal text that is printed on a report; e.g.
WRITE: / ‘Write some sort of message or heading on this line’(XYZ).
The advantage of using Text Elements is easier maintainability and speed of the program. The labels are alphanumeric.
* Do NOT use Text Elements for constants - constants should be defined in a “CONSTANTS” statement.
Literal text MUST BE defined as in the example above.
After the first use of a text (as above) the successive uses of the same text must say “WRITE: / TEXT-XYZ” – it does not matter where in the code the various uses of the text are; e.g. the definition may be on line 55 and the reuse on line 42.
DO NOT TYPE THE TEXT INTO THE TEXT ELEMENT FILE – LET THE SYSTEM DO THAT FOR YOU. When you have finished typing the program with all its texts defined as above then, from within the program, go to the menu option “GOTO, TEXT ELEMENTS, TEXT SYMBOLS” then “UTILITIES, ADJUST, TEXT SYMBOLS” and the system will create or adjust the text elements for you. Easier than entering the text yourself AND it documents the code automatically without you having to place a comment on the line!
Selection Texts:Ensure that all the selection-options and parameters have a corresponding text in the selection texts. Also ensure that there are no additional selection texts .


 . thanks


 . Also check out